 |
 |
| How to use Report Wizard |
Back to Table of Content Download RepWiz Examples Ken's RepWiz Tutorial
Report Wizard or RepWiz is a Windows based program to create queries and reports from data contained in Microsoft databases. DB2000 creates and maintains Microsoft databases, i.e.. .MDB files, and also has the ability to invoke RepWiz by selecting Report Wizard from the Reports Menu. While DB2000 has a built in report facility, it is limited to creating reports which are little more than expanded labels with the ability to include certain preconceived fields by checking boxes. RepWiz on the other hand is a full blown WYSIWYG report designer which also incorporates 3 other wizards for creating various labels and columnar and tabular reports.
RepWiz has the ability to create queries using tables and other queries as the data source, and then to use those resulting queries or tables as the data source for reports. Of course, any query result can be simply printed as a grid if a more refined layout is unnecessary.
The most important point to understand is that while a report may require textual data to appear in a particular format such as Cdr. Robert A. Smith, SN which is a concatenation of RANK(if any) , FIRSTNAME, LASTNAME, a potential comma, and GRADE (if any), you are generally better off if you put the data into that form before attempting to layout a report. This is because the report design facility does not have the ability to work on what are termed text sub strings. This means that it cannot take a field containing a number such as 199305 and extract from it the 1993 as a year or the 05 as a month. It does have the ability to string together multiple fields such as the above rank name grade example, but it is usually easier to do it elsewhere. So, to summarize, the report designer can string fields together, but it cannot break a single field into pieces. However, all is not lost. It was actually designed to behave this way. The query builder, which creates the data source for most reports, does have the ability to use expressions to manipulate data into different formats as well as to order it and to aggregate it in many ways. So, getting back to the primary point, use the data stuffer feature of DB2000 (in the user grid) or the expression capability of the RepWiz query designer to format data elements to be used in a report. Use the Report Designer to control things such as placement, orientation, color, typeface, weight, and size of those data elements.
How to create a report.
The process of creating a report requires that the designer complete an analysis before beginning. Once you understand what data is needed,
what format that data needs to be on the report, and how the report is to be ordered, you then work backwards to determine where/how to get
the data and how to format it and order it in the desired way. If you fail to perform the analysis step at the beginning, and start right in
trying to design a report, you’ll find yourself constantly going back and revising the underlying query design.
I generally recommend using a pencil and a sheet of paper to sketch out how a report is to visually appear.
This should be in sufficient detail to include headings, date formats, footer contents, etc.
Designing A Query
Designing a query is nothing more than formulating a structured question about the records in the database.
In Microsoft databases these questions are posed in a language called SQL (sometimes pronounced sequel). The user however, does not need to know SQL.
The query design facilities isolate the user from SQL by providing a level of abstraction between the data manager and the user.
This greatly simplifies the specification of a query. In general terms a proper query must specify three things:
A list of the data elements to be contained in each row of the returned table.
Criteria for the inclusion of a particular instance/row in the returned table.
Instructions for ordering the selected rows in the returned table.
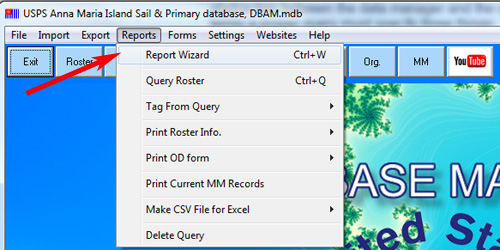
Beyond this, the user can also modify the very data as well as the format of that data in selected columns of the query by using expressions. We begin designing a query by starting the Report Wizard. From the DB2000 main screen this is done by clicking on the Reports menu.

And then selecting Report Wizard.
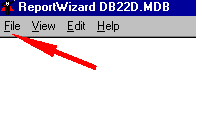
RepWiz will then start and present its primary screen which is just a full white page with four menus, File, View, Edit, and Help. Click on File.
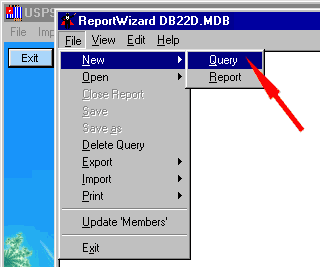
Select New and then select Query.
RepWiz will respond by presenting its Select Data Sources dialog. This is used to select the table or tables to be used as the input data for the query.Generally when running under DB2000 the Tables list will only contain the Members table. The Members table presented in this list is actually a table internally called the EnhancedMembers table which represents a flat view of the combined Members and UserFields tables. This is done to insulate the user from having to formulate more complex queries using elements from more than one table. Occasionally, when entering RepWiz from DB2000 you will notice that RepWiz will rebuild the EnhancedMembers table. This only happens when RepWiz determines upon initial entry that something has changed in either the Members or UserFields since the EnhancedMembers table was last created.

Once you have clicked on the OK button above,
RepWiz will respond by presenting the Query Designer Window.
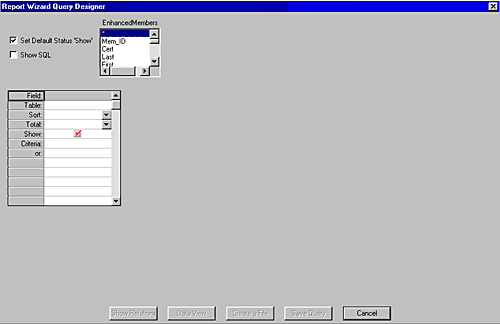
The Query Designer Window contains four controls:
The first is a scrollable list of all data elements in the data source.
Double click on each element to be included in the query.
Elements can be included more than once.
If you plan on ordering your query by certain elements, select those first.
Each element that is included shows as a new column in the Query Design Grid.
Each column in the grid has a number of rows which are named respectively
Field, Table, Sort, Total, Show, Criteria,
and Or.
The Show row contains a check box which is checked if the column is to appear in the output table, and unchecked if the column is not wanted in the output table. Some times a field is needed to make some type of determination, but is not wanted in the output. In those cases, the cell in the corresponding Show row should be unchecked. The check box named Set Default Status ‘Show’ positioned to the left of the element selection list controls the default setting of cells in the Show row for columns being created.
The Table row should always contain the name of the input table from which the element is being taken. This should always contain EnhancedMembers.
The Total row is only used for aggregation queries which are beyond the scope of this document. Cells in the Total row should not be modified unless you fully understand their purpose.
Cells in the Field row are used to provide access to the Delete Column function and the Format Expression Builder. These functions are accessed by right-clicking on the appropriate cell in the Field row and selecting the desired function from the context sensitive menu that results. In addition left-clicking on a cell in the Field row selects the Column Move function. Once a cell in the Field row is selected, the corresponding column can be moved left or right by using a combination of the Ctrl key and the appropriate left or right arrow key.
Cells in the Sort row are used to specify table ordering information. Clicking on the down arrow of the selection list in any cell in the Sort row presents a context sensitive menu containing five options.
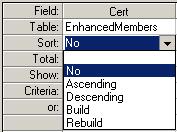
No is the initial or default condition and means that data in this column is not used to determine the order of the query result table.
Ascending means that data in this column is used to determine the order of the query result table and should be used in
ascending sequence.
Descending means that data in this column is used to determine the order of the query result table and should be used in
descending sequence.
Build provides access to an expression builder dialog to create an expression, the resulting value of which will be used
to sequence the query result table in the specified manner.
Rebuild opens the expression builder dialog to edit an existing expression.
The sequence of the query result table can be determined by the data in multiple columns. The precedence rule is that the leftmost column is primary, etc. Therefore if we want to sort a result table alphabetically, i.e. on last name and then on first name within matching last names, the Lastname column must be to the left of the Firstname column.
The Criteria row is used to specify the criteria for including data from a record in the query result table. Right-clicking on any criteria cell presents a context sensitive menu containing two options, Clear, which will clear the existing criteria in that cell, and Build, which will open the criteria expression builder dialog to create criteria or edit existing criteria.
The Expression Builder Dialog is used to create expressions which are can be used to format data, to specify selection criteria,
and to specify sorting instructions. The appearance of the Expression Builder Dialog changes in subtle ways depending on the purpose
for which it was invoked. For example, if it was opened to specify sorting instructions, it includes an Ascending Descending radial button control.
If it was opened to specify selection criteria, it includes a number of relational operator controls such as “=”, “<”, “>”, “<>”,
and a text box for entering constant values. If it was opened to format data elements, it contains a text box to provide a new name for the
element column. This is important. If you are going to reformat a data element in your query using expressions in the Field row, you must
use the As text box to provide a new name for the column. If you fail to do this, the underlying SQL server will force a new name similar
to Exprnnnn. It is not possible to keep the same name for both the pre-formatted and post-formatted values.
The Expression Builder includes shortcut buttons for many of the underlying functions supported by the Microsoft SQL Server.
The absence of a shortcut button does not mean that you can’t include other functions in your expression. It just means that you have to key
in the function yourself rather that having the expression builder create a template for you.
In general, The Microsoft SQL Server will support all functions defined in Microsoft Visual Basic for Applications or MS/VBA.
There is a list of the more common VBA functions at the end of this documentation.
By John Bradley, 2004