 |
 |
| Report Wizard Tutorial |
Back to Table of Content Making the Query Making the report
Report Wizard is capable of making very complex queries to the database and designing sophisticated report layouts.
This is far beyond the capability of DB2000’s query generator and D&D Roster Printer.
Based upon the query and a more flexible data formatting capability it can make many kinds of reports.
• Columnar lists
• Tabular lists
• User designed roster listings including booklet style.
• Mailing Labels
It can include content other than database material:
• Text
• Graphical objects such as line work and shapes.
• Pictures, photo files etc. in most common file formats.
• Color can be applied to most objects and the page background.
A complete explanation of how to use it is beyond the scope of this document, but it is very worthwhile to learn.
The following tips are just meant to get started. There is a help file for Report Wizard.
General RepWiz Characteristics
RepWiz works with DB2000’s “Members” and “UserFields” tables, which it joins to make “EnhancedMembers”.
The new table is a flat database containing most of each member’s data and has
additional enhancements for treatment of dates. It can also get data from the
organization and merit mark tables.
Unavailable is data contained in the DB2000 reference database, such as “squadron name”.
Some of this information can be provided by making user defined fields and putting the information into those.
Making columnar, tabular and labels is quite straightforward. Designing a customized report is a little more complex.
It is based upon making a database query that describes the data content of the report.
DB2000 User Defined Fields
DB2000’s “User” grid can be very handy when using Report Wizard. Laying out multiple formats for a member’s name/rank/grade can be simplified
using the “Data Stuffer” and selecting the name format desired. The “Data Stuffer” can also be used to list the courses a member has earned and this will
simplify an otherwise complex query.
RepWiz User Designed Report Overview
1. Making the Query
For a new report, select “File/New/Query” first to define the report’s content.
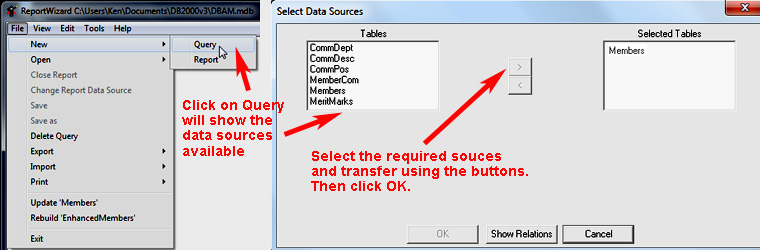
The query is made in a programming language called SQL (Structured Query Language). RepWIz insulates the user from the syntax of the query, but it is still an advantage to know a little about it.
Most queries have the form:
SELECT Field list
FROM Table list
WHERE Field Criteria
ORDER BY Field list
In addition to listing the data fields required, the SELECT part can also format the content of these fields by using appropriate SQL statements.
The WHERE part defines how the fields are to be used. The ORDER BY part the listing order which may be more that one field listed in order of precedent.
In RepWiz the FROM part will always be “EnhancedMembers” since it is the only table available.
A Simple Query Example:
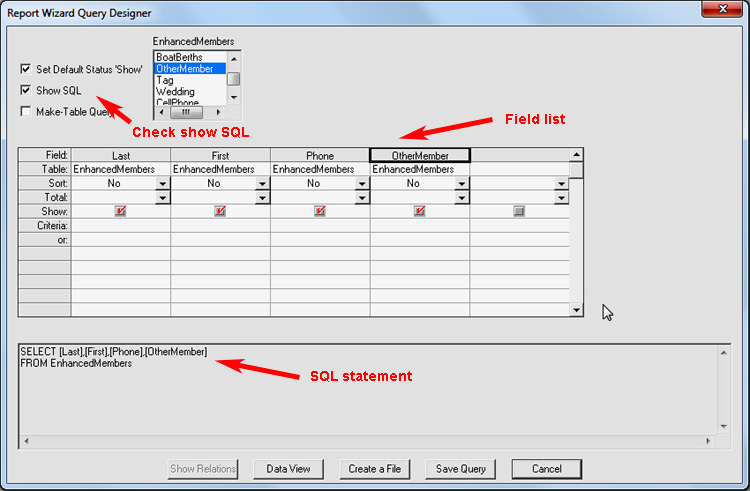
Start a new query. From the field list top left of query generator dialog, double click “Last”, “First”, “Phone”, “OtherMember” adding them to the grid.
The fields will appear in a grid side by side. Now each field has a number of properties that can be assigned in the grid rows.
Check the “Show SQL” check box to see the result so far.
SELECT [Last],[First],[Phone],[OtherMember]
FROM EnhancedMembers
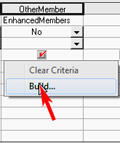 |
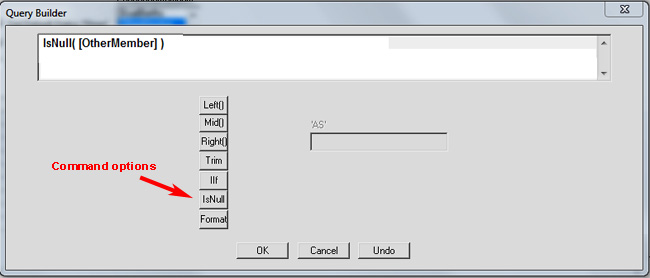
Next define the WHERE part. Select the “OtherMember” column and right click the cell “Criteria” and select “Build”. A new dialog will appear with an assortment of command options. For this example select “IsNull” and IsNull([OtherMember]) will appear in message area. Click “OK” to accept and exit dialog. |
The SQL statement will now be:
SELECT [Last],[First],[Phone],[OtherMember]
FROM EnhancedMembers
WHERE ((IsNull([OtherMember])))
This action means that the list will contain members only and exclude affiliated members because members have no entry in the “OtherMember” field.
Next, set up sort criteria. Select the “Last” column, click on “Sort” cell arrow and Select “ascending” from list. Repeat for the “First” column.
The SQL statement will now be:
SELECT [Last],[First],[Phone],[OtherMember]
FROM EnhancedMembers
WHERE ((IsNull([OtherMember])))
ORDER BY [Last],[First]
There is one problem left. If a member has no phone the “Phone” field will contain “000 000-0000” in the database.
These need to be excluded from the report and replaced with nothing. Select the “Phone” column, right click the column header and select
"Expression". In the resulting list select "IIf" from the command buttons.
"IIf" means “if true do this if not do that”.
It is similar to the conditional in Excel.
In the message area see
"IIf(<expression>,<true>,<false>)".
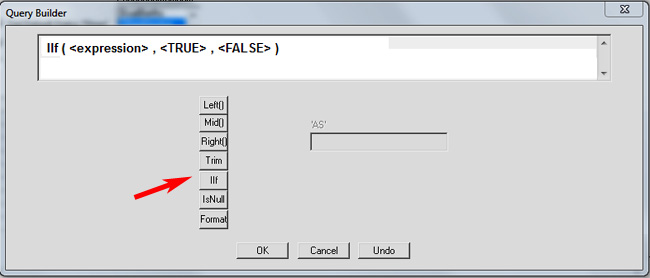
Double click <expression> to highlight it. Select “Trim” and see
"IIf(Trim([Phone]),<true>,<false>)"
Type in the wanted condition noting its exact location;
IIf(Trim([Phone])=”000 000-0000”,<true>,<false>)
Since this condition is the wanted one, next define the true part.
Highlight <True>, type "" and get
IIf(Trim([Phone])="000 000-0000","",<false>)
Where “” is an empty string meaning nothing will be printed.
Next highlight the “<false>” part and select the “Trim” button again and see
IIf(Trim([Phone])=”000 000-0000”,””,Trim([Phone]))
Lastly, because the data defined differs from that contained in the “Phone” field, a new field name must be assigned.
In the “AS” box type “fPhone” and see;
IIf(Trim([Phone])=”000 000-0000”,””,Trim([Phone])) AS fPhone.
Exit dialog and In the query dialog notice that the SELECT line of the SQL statement now shows the new conditions.
Click “Data View” button to see result.
Another useful data formatting example
In the database, zip codes are stored in the 5 + 4 form nnnnn-nnnn. Sometimes the last four digits are not known and are kept as 0000.
If so, we don’t want to print the last 5 characters, “-0000”. Right click the column header “ZIP” and select “Expression”.
From the command buttons select “IIf”. This is a logical test expression and the statement will show.
IIf(<expression>,<true>,<false>)
Double click the <expression> statement and select “Right” from command buttons and enter 5 in the query box.
This selects the right 5 characters in the ZIP field. The expression is now:
IIf(Right([ZIP],5),<true>,<false>)
Between the right parenthesis and comma type =”-0000”
IIf(Right([ZIP],5)=”-0000”,<true>,<false>)
Now the conditional part of the field, and its content have been defined. Next, double click on the “true” part of the expression.
Select “Left” from the command list and 5 in the count dialog.
IIf(Right([ZIP],5)=”-0000”,Left([ZIP],5),<false>)
This means that if the last five characters of the zip code are “-0000” then print only the first five.
Next, define the “false” part. Double click to select and select “Trim” form the command list.
IIf(Right([ZIP],5)=”-0000”,Left([ZIP],5),Trim([ZIP]))
Now the field must be renamed because although using data from the ZIP field it is no longer the same as the ZIP field. Into the text box to the
right of the commands enter a name like fZIP.
IIf(Right([ZIP],5)=”-0000”,Left([ZIP],5),Trim([ZIP])) AS fZIP
That’s it! If these examples of formatting seem complex they are really only a few mouse clicks and key strokes. RepWiz takes care of the syntax.
Label Making Query
While nothing to do with User Designed Reports, it is sometimes necessary to make labels for a number of members but which number and name vary depending on circumstance.
To make a general purpose query, start a new query in the usual way defining the necessary fields, but also include the “Tag” field.
In the criteria row for the tag field, make it [Tag] = TRUE. Also it’s a good idea to not show the Tag field in the query result. Turn off the box in the “Show” row.
Now to make the labels just tag each member needed in DB2000 and use the same query each time to make the labels.
Back to top
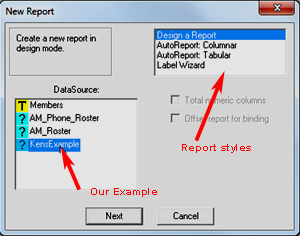 |
After the query has been saved the next step is to make the report. From the menu select new report. From the resulting dialog select the type of report and name of the query it is to use. Select “Design a Report” and follow the on screen instructions until the report design page is displayed. |
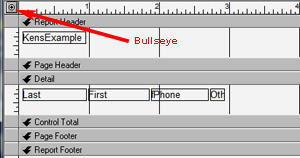 |
There will be a number of horizontal bars dividing
the page into Report Header, Page Header, Detail, Control total,
Page Footer and Report Footer. In the detail part, the fields
defined in the query will be displayed. |
Define Report Attributes
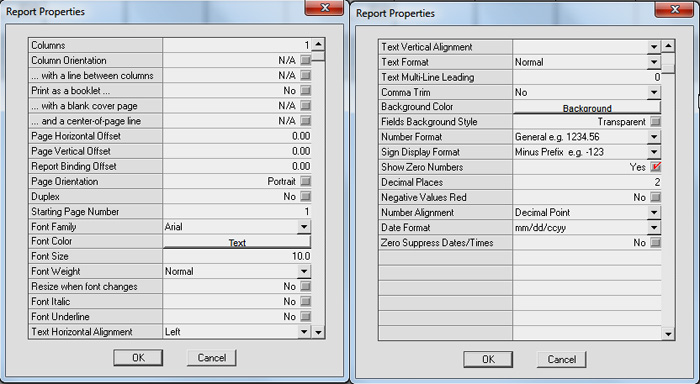
At the top left of the grid is a “Bulls-eye” button. Click on this to display a list of report attributes and make an appropriate selection.
Don’t worry about getting it right first time, attributes, such as offsets, can be changed later if need be.
Sort Out the Fields
Available Tools
1. Right clicking the detail area background produces a popup menu offering several options.
Select all objects / Delete all objects / Properties / New Object / Insert Section.
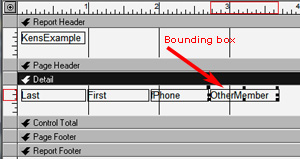
2. Select a single object by clicking on it. It will now have a bounding box allowing moving and sizing.
Right clicking the selected object brings up its properties list.
3. Select multiple objects by clicking on them while holding down the Ctrl key.
Right clicking multiple object groups offers a number of formatting options.
These include alignment in various locations, abutments, linking / unlinking and group properties.
Using these tools, arrange the fields as they
should appear in the report.
There’s nothing like practice to master this.
At any time the report may be previewed.
Select Print/Preview from the menu. A printer dialog will appear the first time this is done.
If the printer settings do not suit the report attributes selected, open the printer dialog and set up such things as paper size, orientation,
printing one or two sided etc. This is a must, it affects the preview which takes direction from the printer settings.
When the preview appears the current status will be revealed. It will probably be necessary to flip back and forth between design
and preview to optimize the layout. NOTE: To see each page in the report use the Page Up and Page Down keys.
Headers and Footers
The text in these areas is typed in by the user. In the Report Header section select the text box labeled “Report Main”, right click to raise its properties dialog.
This provides many options for font, font size and text alignment. The bottom line of the grid is “Data”.
Type here what is wanted in the text object. When returning to the design view, the bounding box will have to be sized and aligned manually.
If another object is required in the header area, right click on the background and select from the popup menu.
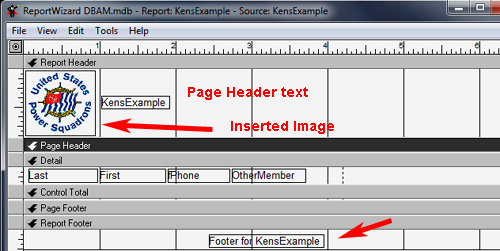
NOTE 1: If a graphical object is added such as a squadron burgee, it is a good idea to copy the file to a sub-folder of DB2000.
This way, it is less likely to get lost when doing general file management on the computer. E.g. With Windows Explorer select the folder DB2000v3
and make a new sub-folder Images. Put all graphic objects there. Also, although RepWiz can size the image, it is a good idea to optimize it for
this purpose in an image editor to keep file size under control. In other words, don’t put a 5 mega-pixel photo and size it to 1 X 1 inches in RepWiz.
Make a few kilobyte version of it instead.
NOTE 2: In the properties for headers and footers, the user may select if the area is to be displayed on every page.
Images in the Detail Area
A new feature of RepWiz allows unique images to be placed in each record. This could be a thumbnail portrait of the member, a picture of his boat, or both.
To make this work, a user defined field must be made in DB2000. Make a text field with enough length to contain the image path, say 100. Make the images
and put them into the image folder. For each record, where a picture is needed, type in the complete path to the image into the user field.
E.g. “C:\Program Files\DB2000v3\Images\FilthyScow.jpg”
By J. Kenneth Guscott, 09/14/05, revised 06/27/16
Back to top