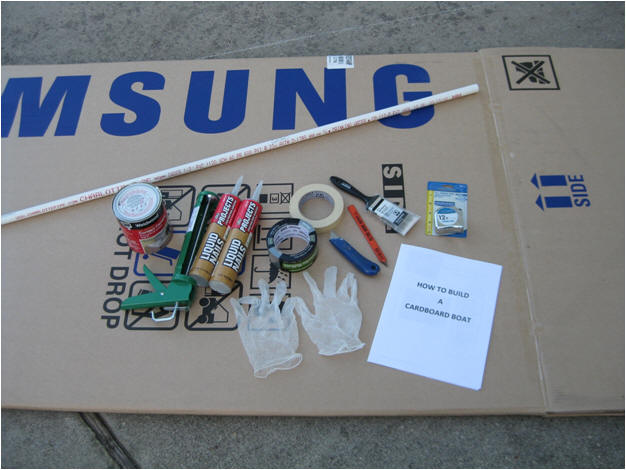
Materials included in the "kit" to build your boat:
Illustrated Instructions
1 Refrigerator Box
2 PVC Tubes (each 5 ft long)
1 Quart Can Contact Cement
1 Caulking Gun
1 Tape Measure
1 Brush
1 Box Cutter
1 Roll of Duct Tape
1 Roll of Masking Tape
1 Pencil or Marker
2 Tubes Liquid Nails
1 Pair plastic gloves

The standard "box" will be a refrigerator box.
Note there is a seam where the box is "welded" together. This is where you need to cut your box. Then lay it out flat.
(Thanks to HH Gregg in Huntsville for all the boxes.)

Here is the refrigerator box laid out flat after being cut at the seam. Note the "natural" creases. Those will be helpful in determining where the "chine" of your boat will be.
This is also a good opportunity to see where the perforated "holes" (hand-holds) are in the box. Mark them clearly on both sides with a marker so you won't miss any. You will need to seal any perforations in your boat sides and bottom later on to make it watertight.

Decide how wide you want to make the bottom of your boat and how high you want the sides to be. In this example, the bottom of the boat will be 26 inches and the sides 12 inches each.
You can see the "natural crease" in the cardboard box that will be one chine of the boat. The yellow dotted line shows where you will crease the box again, making the other chine of the boat.
Once you are satisfied that you have measured your boat correctly, make one straight cut which will free almost the entire boat from the box. It is a good idea to use a straight edge and cut slowly and carefully here.

Now you can carefully make the crease that will become the second chine of your boat. You can use the handle of scissors or a screen tool to carefully crush the cardboard slightly to allow you to crease along a very straight line. Be careful not to cut all the way through the cardboard!
If you have cut the boat out carefully enough in the previous step, you don't have to make the cut shown here. This person is measuring the opposite side of his boat so he can make it the same height as the other side of his boat.

Again, you should already have your boat cut out, but if one side needs to be cut to match the first side, make a very straight cut. Use plywood or other material under the cardboard when making any cuts. This will allow you to make much straighter and more consistent cuts.

Your boat will need a transom and two bulkheads. Here we see the transom being made up of two identical-size pieces of cardboard. Measure your boat carefully to determine the size of cardboard to cut out.
Read the instructions on the contact cement. Brush on the cement to all surfaces that are to be glued together. Then let the cement dry before bringing them in contact with each other. The cement sticks instantly and dries very quickly. Don't get contact cement where you don't want it.
Tip: To save time, cut out six identical pieces of cardboard and glue up the transom and the center and forward bulkheads at one time. Use two pieces of cardboard each.

Here we see the center bulkhead being installed. If you already glued up the center bulkhead in the previous step, you will be installing that as a one-piece unit.
The position of the center bulkhead will depend on the size of your boat and the size(s) of your crew. Even if there's only going to be one person aboard, you will still need the center bulkhead for stability.
Use contact cement to glue the bulkhead into the boat.

The boat is now beginning to take shape.
The center bulkhead is installed and the glue is drying. Note the use of duct tape to hold all pieces together while the glue dries.
Look carefully and you can see the transom in the boat. It's to the right of the cooler. Duct tape is in place there too.

Use liberal amounts of Liquid Nails around all joints and seams. Do this as you go, so the Liquid Nails will be drying as you continue building the boat.
Liquid Nails is an excellent sealer for the joints and for edges of the cardboard too.
Remember - drying time for the Liquid Nails is approximately 3 hours, so don't wait until the boat is done to put it on your boat. It all needs to be completely dry before the boat race!

Now you can turn your attention to the bow area of the boat.
Look closely and you will see a slight crease across the bottom of the boat. It's at the point of the box cutter.
Here, we are making a careful and straight cut from the crease out to the front of the boat. Cut carefully along the chine crease for a straight cut.

Now you can see the beginnings of the bow of the boat. The two sides of the bow are loose and have been creased back at the same length.

Draw a centerline on the bottom of the boat up at the bow. This will be your guide as you hold the two sides of the bow together to ensure they are exactly the same length. If you make them different lengths, the bow will not be in the center of your boat.

Now you can decide the angle of the bow. Measure up on the front edge of one side of the bow and make a mark. Using a straightedge, carefully draw a line from the bottom of the side up to your mark.
Make the exact same measurement on the other side of the bow and draw another identical angled line on that side.
Cut both sides along the lines you have drawn. Be sure to make straight lines so you won't have to fill any big gaps between the cardboard.

Test-fit the forward bulkhead you glued up earlier. The bottom of it will go where the bow angles up from the bottom of the boat.
Keep it handy because you will be installing it soon.

Hold the two sides of the bow together and hold up the bottom flap of the bow. Carefully line up the ends of the sides with the center line you drew earlier.
Have your team-mate hold these items as you carefully mark a line on the bottom flap along both sides. You will then cut along these marks.

Now you can see the sides of the bow and the bottom flap of the bow after they have been angle cut.
Use contact cement everywhere two pieces of cardboard will come into contact with each other.
Install the forward bulkhead you glued up and test-fit earlier. Put it exactly where the bow begins to angle upward from the bottom of the boat. It will also fit where the sides of the bow angle out to meet each other at the bow.

Use plenty of contact cement and hold everything in place with duct tape as it all begins drying.

Again, use plenty of Liquid Nails right away in all seams and joints.

You will want to install a forward deck to enclose the bow along with the forward bulkhead. Here we have measured out a triangle of cardboard to fit just right.

Again, use contact cement on all mating surfaces, then install the forward deck and hold it in place with tape as it begins to dry.

Before you go any further, stop and use Liquid Nails to seal all raw edges of cardboard on your boat. Concentrate on any that will come in contact with the water.
Push the Liquid Nails into the holes in the cardboard with your finger or a small scrap piece of cardboard.

Masking tape can be used to cover up and seal all raw edges along the top of the boat. This needs to be done before you paint your boat.

Here is a look at the completed boat. It still needs the masking tape along the top edges and needs to be painted, but the construction is complete and the glues and cements are dry.
This boat is 26 inches wide with 12 inch high sides. It is 83 inches long (approximately 7 feet). Using calculations we learn in the US Power Squadrons, this boat should be capable of holding over 800 lbs of passengers.

Don't forget you need to propel your boat. Your materials kit includes two 5 foot lengths of PVC pipe. With these, you can either make two "kayak" style paddles, or two "canoe" style paddles.
Cut out a piece of cardboard with a "natural crease". Cut the shape you want your paddle to be. Using the PVC as a guide, measure back from the crease approximately 3 inches. Make a mark there representing the end of the PVC handle.

Cover both halves with contact cement and let it dry. Squeeze ample amount of Liquid Nails on both halves, concentrating where the PVC handle will be.
Carefully lay the PVC handle in one half of the paddle, being careful to line it up straight and stopping at the 3 inch mark you made earlier.
Once you're satisfied with the line-up, carefully fold the other half of the paddle over and squeeze it together very tightly.
You will be amazed how quickly the contact cement sticks the entire "sandwich" together, but be sure to let everything dry thoroughly.

Here is a finished paddle ready for the raw edges of the cardboard to be filled in with Liquid Nails to seal them from the water.
Then it can be taped over and then painted.
If you are only going to have one person in your boat, you're done with construction. If you'll have two in the crew, you still have one more paddle to make!

Here's a tip...
You will have lots of cardboard left over after construction is completed. Think of good ways to utilize this remaining cardboard to your advantage.
You could make a keel for your boat.
You could double-up the thickness of the floor of the boat.
You could add another "bottom" to the boat.
You could strengthen the transom of the boat.

Painting your boat might be the most fun and enjoyable thing about the construction.
Use "Kilz" to cover the cardboard before painting. Kilz will seal the paper and it drys very quickly. Use at least one coat but no more than two coats of Kilz.
Be creative with colors. Think of a theme.
Give your boat a good name and paint the name in contrasting color on your boat!
Now relax and let everything dry.
Get ready for the big race!