 |
 |
| Making MM recommendations in DB2000 |
Back to MM Guide
Back to Table of Content
To begin creating merit mark recommendations click on the MM Button on the main menu.
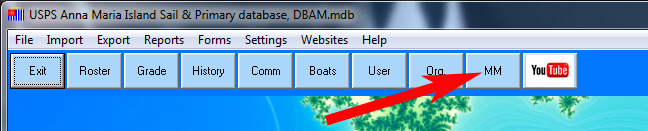
This will open the Merit Mark Recommendations page.
On the top of the page you will see a number of buttons.
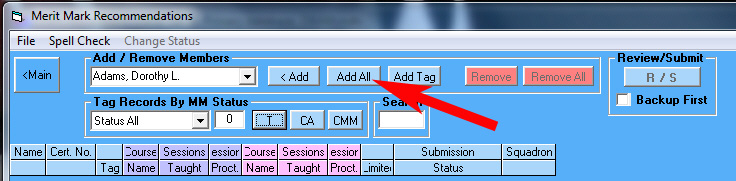
Click the one labeled “Add All”. This will add all the members of your squadron
to the merit mark candidate grid.
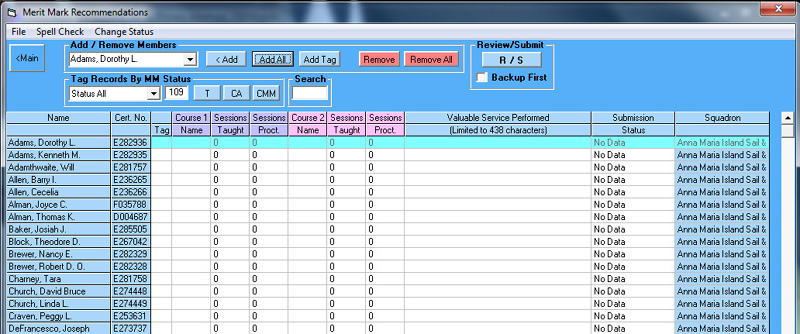
Now if you look at the Submission Status column you will see that all rows have a status of “No Data”. This grid has twelve (12) columns. You will notice that six columns are arranged in two groups labeled “Course 1” and “Course 2”. These columns are used to enter the course name and number of sessions taught and/or proctored, for up to two courses. But you say, “what do I do with a member who has taught more than two courses”? The answer is, you ignore the course(s) beyond two which have the least number of sessions taught or proctored.
It is not necessary to write a novella describing everything someone has done during the year. It is only necessary to provide sufficient information to convey to the Chief (Area Monitor) why you are recommending this member for a merit mark. If you are using the two columns to enter course taught data for a member, then do this. Begin by high-lighting the Course Name cell either by clicking in it or by using the up/down and left/right arrow keys to navigate to it. When the cell background turns from white to turquoise it means the cell is selected. To open the cell for data entry either double-click in it or press Enter/Return when the cell is selected.
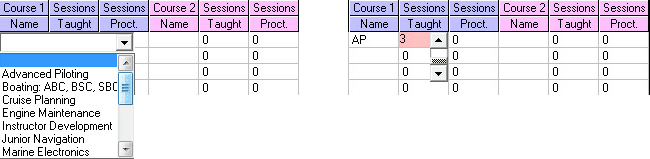
When the Course Name cell is open, a pull down list will appear. Select the appropriate course name in the list by clicking on it. This will close the list and move the course name abbreviation into the cell. If you make a mistake, just do it again. Remember to do the course name before attempting to enter a number for courses taught or proctored. Once the course name has been entered, select the appropriate cell to enter a number for sessions taught and/or proctored. Again the background will become turquoise when the cell is selected. Open the cell in the same manner as previously described. Use the up and down arrows on the control which appears to enter a number. When you have entered the correct number of sessions, close the cell either by pressing enter/return or by double-clicking in the pink area.
The column entitled “Valuable Service Performed” is used to describe other types of service performed. Select the cell for the record you are working on and double click or press Enter, the cell background will turn pink. You may now enter your recommendation text. Press Enter/Return or double-click to close the cell.
If a member has only taught or proctored courses and has no other
valuable service it is a good idea to add some further description in the
valuable service cell. Some Area Monitors have been known to disapprove
if not.
You will notice that the valuable service is limited to 438 characters.
No matter how productive a member may have been you don't have to
include everything. Use abbreviations to conserve characters. Hrs.
instead of Hours for example. If spell checking is available (you have
Microsoft Word installed) it is a good idea to enter your abbreviations into the
dictionary. then if you run a spell check they will not b flagged as a
spelling errors.
As you finish entering data into a cell you will notice that the Submission Status for that member changes from “No Data” to “No Recommendation”.
When you have finished entering all of your merit mark data for all members, it is appropriate to remove the records for members who did not do anything. Their submission status will be “No Data”. Use the Change Status menu, and select the “Remove All No Data” option. The records will be removed from the merit mark grid.
Next we need to change the submission status for the remaining records.
At this time they should all have a submission status of “No
Recommendation” and we want to change that to “Original”. Using the same
Change Status menu, select the “Change All No recommendation to
Original” option.
When you are ready to submit your recommendation you need to Click the
Review/Submit button top right on form. This will open a new dialog
window.
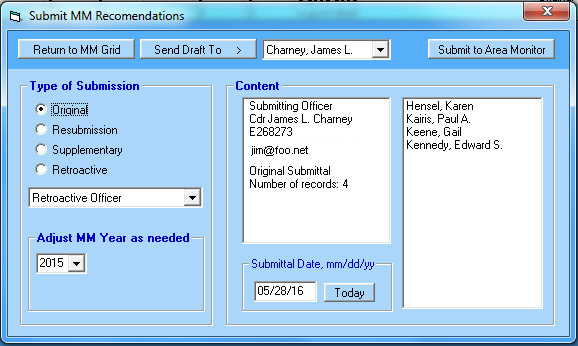
Some time ago it was decided that DB2000 would be the only way of submitting merit mark recommendations which is done electronically. First check the data displayed to make sure its correct. If for example the Submitting Officer is missing or incorrect it probably means that DB2000 doesn't know who the commander is. To correct this leave the merit mark pages and return to the main screen. Open the Roster Grid make sure the SQ_Rank field is selected to Cdr, or D/C for a district, submission. Make sure no other member has this rank and remove if so. DB 2000 will use the first one it finds.
Once all the data on the submittal form is correct you can submit to the Area Monitor. You may not be the commander but have prepared the recommendations for the commander. Before you submit you can send a draft copy to the commander (or anyone else for that matter) for approval.
In addition to Original submissions you can also process Resubmissions,
Supplementary and Retroactive submissions.
A Supplementary is sent after the Original if you forgot someone.
A Resubmission is sent if a recommendation was rejected and you want to
provide more info for reconsideration.
A Retroactive is sent when someone in a previous year was overlooked.
They must be sent from the commander of the year in question.
If these all exist in the same MM list they must be submitted separately
by selecting the appropriate type of submission.
For convenience, merit mark recommendations can be printed. This is done
from the main screen under the Reports Menu. Printed lists cannot be
used for submission. If sent they will be ignored.
After the area monitor has processed your recommendations you will
receive an email with a file attached containing the results.
 It
will be a list of certificate numbers followed by
It
will be a list of certificate numbers followed by
A for accepted
X for rejected
Save the attachment to a location where you can find it again.
...\My Documents\DB2000v3 is a good choice.
This file can be imported into the DB2000 merit mark grid.
Open the file menu and select Submission Status Update. Find the file
from the resulting dialog and click Open
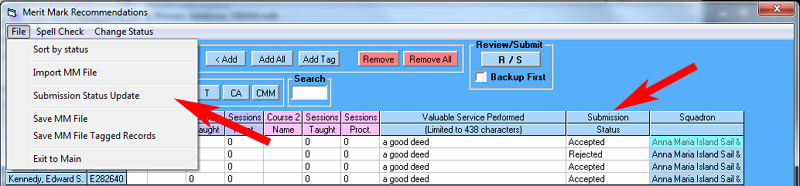
The submission status column will be updated. You may wish to consider a
Resubmittal submission at this time.