Creating/Editing an Article Help
This help file provides instructions on how to create or edit an article on the USPS website. To create or edit an article you need to login to the back-end of the website. To access the back-end, go to https://www.usps.org/administrator. Login with the same Username and Password you were given for the backend of the website, not the one you use for the front end of the website. Access Controls set by the Site Administrators determine what you have access to on the back-end.
Creating/Editing an Article
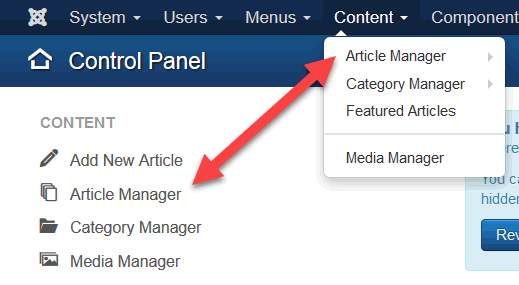
You open the Article Manger by selecting Content > Article Manger from the either the top menu or side menu of the Control Panel.

When you select the Article Manger, it will display a list of existing articles. You will only be able to edit the articles that you are authorized to edit.
To edit an existing article, click on the article's name. If there are a lot of articles, you will find it easier to find a specific article by reducing the number of articles listed. If you know any part of an article's name, you can enter that into the search box to list only articles that contain the search criteria. You can also limit the list of articles by Status, Category, Author, Access, etc. by clicking on the blue Search Tools button. This will display seven drop down boxes that allow you to further filter the articles listed. For example, to list only articles that are in a category you are authorized to use, click on the Select Category drop down box and select the category. By default, all of the articles in sub-categories will be displayed too. To filter out the subcategories set the Select Max Levels drop down to "1" You can limit the articles in your list further using more than one of the drop down boxes. To list all of the articles again, you must return all of the drop down boxes to their initial state and remove any text in the Search box.

The Article Manager Toolbar is located at the top of the page.
![]()
The buttons you see in the Article Manager Toobar may vary (If you are not authorized to do batch processing, you will only see the New button but most of the other button actions can be performed on individual articles from the list of articles.)
Select New to create a new article. The default text editor, JCE, will then be displayed. (See Help > JCE Editor)
Article Status settings
The three icons in the Status column on the left of title indicate what the articles status is and allow you to change it.
Clicking on the first two icons will toggle Published/Unpublished and Featured/Not Featured respectively. These options can also be set in the Content tab of the Article Editor.
![]() Published, featured article.
Published, featured article.
 Published, not featured article.
![]() Unpublished article.
Unpublished article.
![]() Trashed article
Trashed article
The third icon opens a drop down box that lets you change the article's status to Archive or Trash. Selecting either one of these options will remove it from the default list of Published/Unpublished articles. To remove an article from Archive status, go to the Select Status search box described above and select Archive. A list of achieved articles will be displayed. The third Icon in the Status column will now allow you to Unarchive or Trash the article. If you select Trash in the Select Status search box, the third icon in the status column will allow you to Archive or Publish the article.


