Creating/Editing an Article Help
This help file provides instructions on how to create or edit an article on the USPS website. To create or edit an article you need to login to the back-end of the website. To access the back-end, go to https://www.usps.org/administrator. Login with the same Username and Password you were given for the backend of the website, not the one you use for the front end of the website. Access Controls set by the Site Administrators determine what you have access to on the back-end.
Creating/Editing an Article
You open the Article Manger by selecting Content > Article Manger from the either the top menu or side menu of the Control Panel.
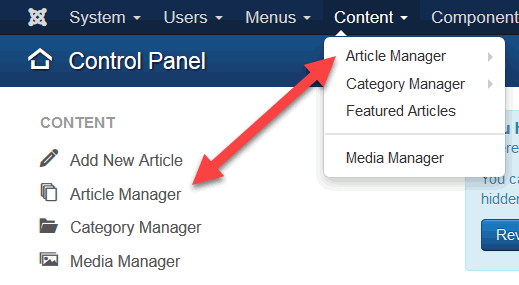
When you select the Article Manger, it will display a list of existing articles. You will only be able to edit the articles that you are authorized to edit.
To edit an existing article, click on the article's name. If there are a lot of articles, you will find it easier to find a specific article by reducing the number of articles listed. If you know any part of an article's name, you can enter that into the search box to list only articles that contain the search criteria. You can also limit the list of articles by Status, Category, Author, Access, etc. by clicking on the blue Search Tools button. This will display seven drop down boxes that allow you to further filter the articles listed. For example, to list only articles that are in a category you are authorized to use, click on the Select Category drop down box and select the category. By default, all of the articles in sub-categories will be displayed too. To filter out the subcategories set the Select Max Levels drop down to "1" You can limit the articles in your list further using more than one of the drop down boxes. To list all of the articles again, you must return all of the drop down boxes to their initial state and remove any text in the Search box.

The Article Manager Toolbar is located at the top of the page.
![]()
The buttons you see in the Article Manager Toobar may vary (If you are not authorized to do batch processing, you will only see the New button but most of the other button actions can be performed on individual articles from the list of articles.)
Select New to create a new article. The default text editor, JCE, will then be displayed. (See Help > JCE Editor)
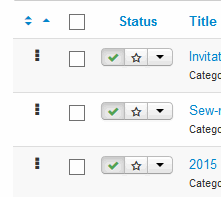
Article Status settings
The three icons in the Status column on the left of title indicate what the articles status is and allow you to change it.

Clicking on the first two icons will toggle Published/Unpublished and Featured/Not Featured respectively. These options can also be set in the Content tab of the Article Editor.
![]() Published, featured article.
Published, featured article.
 Published, not featured article.
![]() Unpublished article.
Unpublished article.
![]() Trashed article
Trashed article
The third icon opens a drop down box that lets you change the article's status to Archive or Trash. Selecting either one of these options will remove it from the default list of Published/Unpublished articles. To remove an article from Archive status, go to the Select Status search box described above and select Archive. A list of achieved articles will be displayed. The third Icon in the Status column will now allow you to Unarchive or Trash the article. If you select Trash in the Select Status search box, the third icon in the status column will allow you to Archive or Publish the article.
Changing the way the Article List is sorted
![]()
Clicking on a column heading will order the article list by that column. The selected column will have a triangle next to the column heading that indicates that the column is selected and whether the column is sorted in ascending or descending order. Clicking on the column heading again will change the sort from ascending to descending or vice versa.
Changing the Order of Articles on the website
The first column of the article list allows you to change the order of the articles that are displayed on a website page. To change the order of the articles, you should first filter the articles listed to only those that appear on the page you want to reorder by clicking on the Select Category search box and selecting the category of the page you are working on. (Remember to set the Set Max Levels drop down to "1" if there are subcategories.) Then click on the blue double arrow icon at the top of the first column. This will list the articles in the order that they appear on the webpage and the three dots in front of each article will change from gray to black.
By clicking and holding the cursor on the three black dots in front of each article, you can drag the article up or down in the list.
Content Tab
When the editor is displayed, a number of Parameters are displayed in the Content tab. Parameters with an asterisk are required.
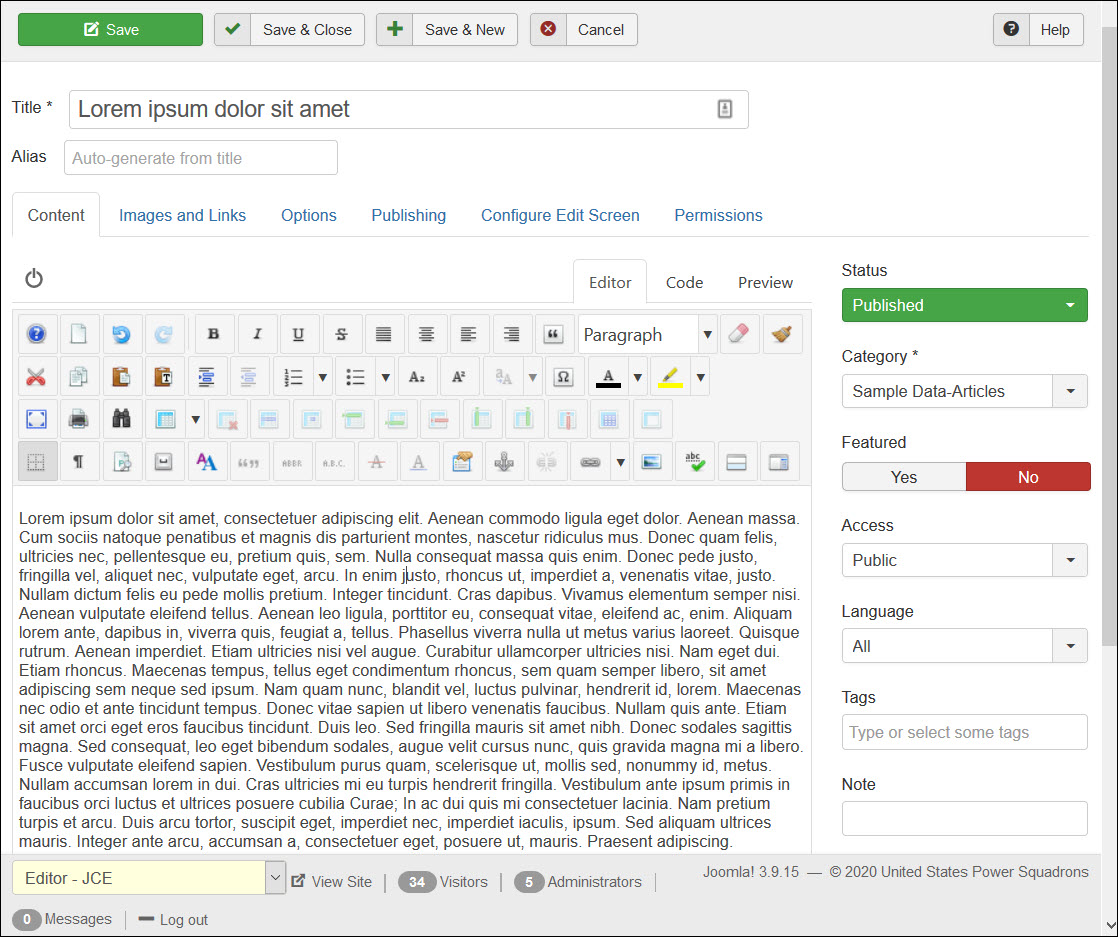
Enter (or edit) the heading information in the fields described below:
- Title * (at the top.) The Title for this item. By default this will not display on the article.
- Alias (at the top.) The internal name of the item. Normally, you can leave this blank and the system will fill in a default value. The default value is the Title or Name in lower case and with dashes instead of spaces. You may also enter the Alias manually. The Alias should consist of lowercase letters and hyphens (-). No blank spaces or underscores are allowed. If the title consists of non-Latin characters, the Alias will default to the current date and time, for example "2009-02-11-17-54-38". The Alias must be unique in each category even if the title is a duplicate. If you receive an error message that the Alias already exists but you can't find it listed—its probably an article that has been archived or trashed.
- Category * (on the right.) The Category tells the website where to place the article. Select the Category for your Article from the drop-down box. Only the categories you are authorized to use will be displayed. Categories may have sub-categories (i.e., there may be a Development sub-category). The Development category is a place where only those authorized to create articles for the category can view the articles. You can place articles here while working them, or until you are ready to publish them. Once you are finished with the article, assign the article to your main category and everyone will be able to see it.
- Tags (on the right.) Assigns Tags to the article.
- Status (on the right.) Determines whether or not this item is published, archived or trashed. Published and Unpublished control whether or not the article is visible to website users. If it is set to Unpublished, users can not see the article, however, anyone authorized to update the article will still see it. You can leave this field set to Unpublished if you are still working on the article and are not ready for others to see it. If you are using a Development Subcategory, website users will not be able to see the article even if it is Published. Archived is used when you don't want use the article now but plan on using it in the future. Archived articles will not appear on the front-end (even to you.) Trashed is where articles go when you are finished with them and Trash them. While the trash is periodically emptied, you may recover an article you just deleted by mistake from the trash, but don't assume you will be able to recover the article at a later date. You can recover Trashed and Archived articles by opening the article and changing the Select Status filter at the top of the Article Editor from either Archived or Trashed to Published or Unpublished.
- Featured (on the right.) Select Yes or No in the drop down list to indicate whether or not an Article should appear on the Home Page. You should not set this to 'Yes' unless you have been authorized to do so.
- Access (on the right.) Determines who has access to this article. Only Access Levels that your are authorized to use will be displayed. Options include (but are not limited to):
- Public: Everyone has access to the article.
- Public View: Only users that are not logged into the website will have access to the article. USPS Members and other users logged in will not have access to the article (but it will be displayed to those authorized to edit the article.)
- USPS Members: Only USPS members will have access to the article.
- [Category Name] Admin: Only users with access to the Category will have access to the article.
- Language (on the right.) Not currently used since the website only uses English.
- Version Note (on the right.) Allows you to make a note about the current article update to help locate it in the Version list (the version feature is described below.)
Editor
The default editor is displayed when the Content tab is selected.
- JCE — a WYSIWYG editor (system default)
A WYSIWYG (What You See Is What You Get) editor provides a familiar word-processing interface to use when editing Articles and other content. Use of the JCE editor is covered in the JCE Editor Help file.
You can increase the size of your edit window by dragging the lower right side of the edit window down.
![]()
Publishing Tab
This section allows you to enter publishing parameters for this Article, as shown below:
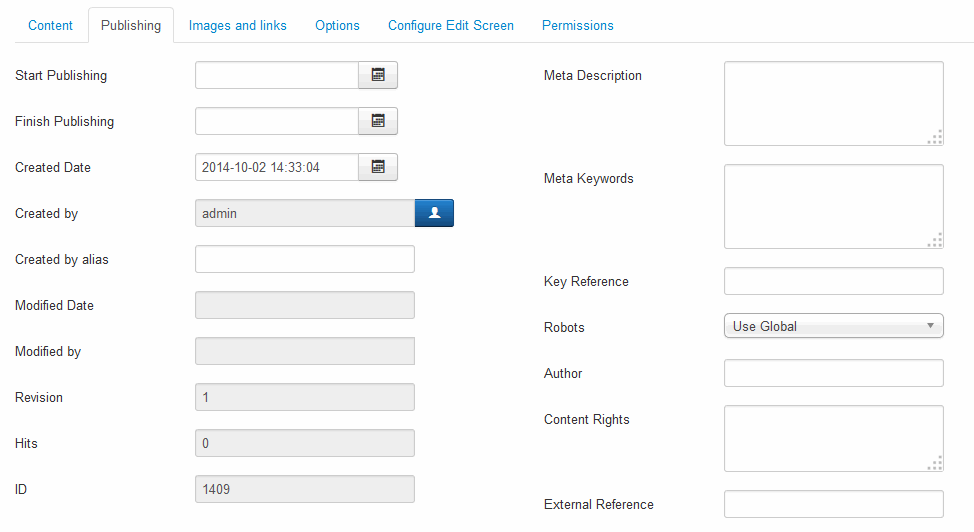
These entries are optional.
- Start Publishing. Date and time to start publishing. Use this field if you want to enter content ahead of time and then have it published automatically at a future time. If you want your article to appear on a future date, you must still set it to Published or it will not appear on the selected date.
- Finish Publishing. Date and time to finish publishing. Use this field if you want to have content automatically changed to an Unpublished state at a future time (for example, when the event has passed). Finish Publishing defaults to Never. If you enter a date, your article will no longer be displayed to users of the website after the selected date. This insures that outdated information is not displayed the website.
- Created Date. This field defaults to the current time when the Article was created. You can enter in a different date and time or click on the calendar icon to find the desired date.
- Created By. Name of the User who created the article. This will default to the currently logged-in user. If you want to change this to a different user, click the Select User button to select a different user.
- Created by alias. This optional field allows you to enter in an alias to be displayed if Author is displayed (not displayed by default.)
- Modified Date. (Informative only)
- Modified By. (Informative only)
- Revision. (Informative only) Number of revisions to this item.
- Meta Description. (Optional information that is not required. Use only if you know what you are doing.) A paragraph used as the description of the page in the HTML output. This will generally display in the results of search engines. If entered, this creates an HTML meta element with a name attribute of "description" and a content attribute equal to the entered text.
- Meta Keywords. (Optional information that is not required. Use only if you know what you are doing.) Keywords must be entered separated by commas (for example, "cats, dogs, pets") and may be entered in upper or lower case. (For example, "CATS" will match "cats" or "Cats").
- Robots. (Optional information that is not required. Use only if you know what you are doing.) The instructions for web "robots" that browse to this page.
- Author. (Optional information that is not required. Use only if you know what you are doing.) Entry for an Author name within the metadata. If entered, this creates an HTML meta element with the name attribute of "author" and the content attribute as entered here.
- Content Rights. (Optional information that is not required. Use only if you know what you are doing.) Describes what rights others have to use this content.
- External Reference. (Optional information that is not required. Use only if you know what you are doing.) An optional reference used to link to external data sources. If entered, this creates an HTML meta element with a name attribute of "xreference" and a content attribute equal to the entered text.
Images and Links Tab
For advanced use only.
Options Tab
This section allows you to enter additional parameters for this Article. Holding the cursor over a selection will display a Tool Tip with information on what the selection does. The Options settings are show below:
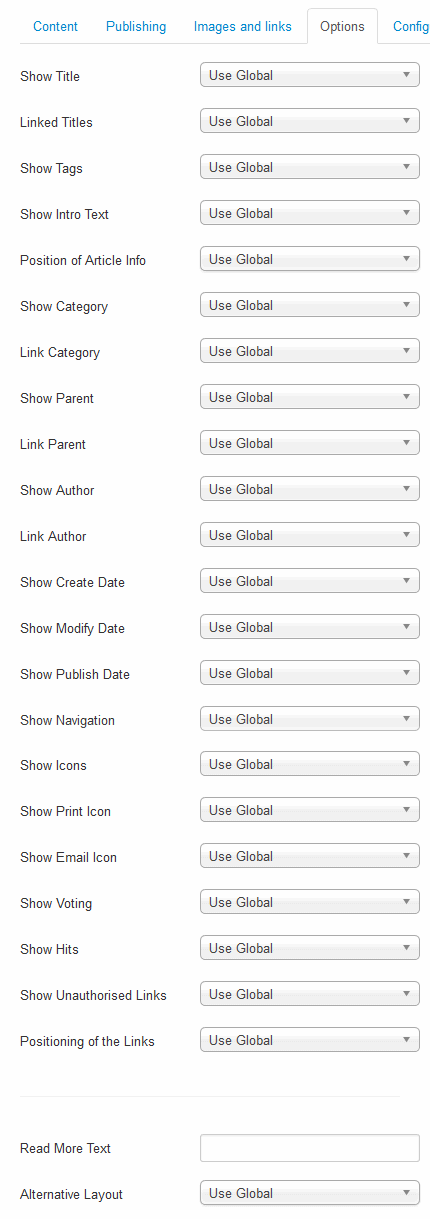
Access to the some of the Option selections is restricted. Most of these options will use the default Global setting no matter how the Article Options are set. If you feel you need to set one of the options you don't have access to, contact a System Administrator. 'Show Intro text' and 'Read More Text' can be set from Article Options.
- Show Title. (Use Global/Hide/Show). Determines whether or not to show the Article's Title. (Default is Hide—can't be set in Article Manger.)
- Link Titles. (No/Yes/Use Global) Whether or not the Title of the Article will be a hyperlink to the Article. (Default is No—can't not be set in Article Manager.)
- Show Intro Text. (Use Global/Hide/Show). Hide or Show the Article's Intro Text when 'Read more...' is selected. Intro Text is the first part of the Article before the 'Read more...' break. If this parameter is 'Show', when the User selects 'Read more...', the entire article will display. If this parameter is 'Hide', when the User selects 'Read more...', only the part of the Article after the 'Read more...' link will display. (Default is Show—can be set in Article Manger.)
- Show Category. (Hide/Show/Use Global) Whether or not the Category Title will display. (Default is No—can't not be set in Article Manger.)
- Link Category. (No/Yes/Use Global) Whether or not the Title of the Category will be a hyperlink to the Category page. (Default is No—can't not be set in Article Manger.)
- Show Parent. (Use Global/Hide/Show). If set to show, the title of the article's parent category will show. (Default is Hide—can't not be set in Article Manager.)
- Link Parent. (No/Yes/Use Global). If set to Yes and Show Parent is set to Yes, the Parent Categories Title will be a link showing articles in that category. (Default is No—ca'tn not be set in Article Manger.)
- Show Author. (Hide/Show/Use Global) Whether or not to display the Author's Name. (Default is Hide—can't be set in Article Manger.)
- Link Author. (No/Yes/Use Global). If set to Yes, the Article's Author will be linked to contact page if one exists. (Default is No—can't not be set in Article Manger.)
- Show Created Date. (Hide/Show/Use Global) Whether or not to display the date and time the Article was created. (Default is Hide—can't be set in Article Manger.)
- Show Modify Date. (Hide/Show/Use Global) Whether or not to display the date and time the Article was last modified. (Default is Hide—can't not be set in Article Manger.)
- Show Publish Date. (Hide/Show/Use Global) Whether or not to display the date and time the Article was published. (Default is Hide—can't not be set in Article Manger.)
- Show Navigation. (Hide/Show/Use Global). If set to Show, displays a navigation link (Next, Previous) between articles. (Default is Hide—can't not be set in Article Manger.)
- Show Icons. (Hide/Show/Use Global). Print and Email will utilize icons or text. (Default is Show—can't not be set in Article Manger.)
- Print Icon. (Hide/Show/Use Global) Whether or not to display a button to allow the Article to be printed. This allows the User to print the current Article in a printer-friendly format. (Default is Hide—can't be set in Article Manger.)
- E-mail Icon. (Hide/Show/Use Global) Whether or not to display a button to allow the Article to be e-mailed. This displays a form that allows the user to send an e-mail with a link to the current Article. (Default is Hide—can't not be set in Article Manger.)
- Show Voting. (Hide/Show/Use Global). If set to Show, a voting system will be enabled for articles. (Default is Hide—can't not be set in Article Manger.)
- Show Hits. (Hide/Show/Use Global). If set to Show, the number are hits on a particular article will be displayed. (Default is Hide—can't not be set in Article Manger.)
- Show Unauthorized Links. (Hide/Show/Use Global). If set to show, links to registered content will be displayed in the Read More Intro Text even if you are not logged-in—you must log in to access the full item. (Default is Hide—can't not be set in Article Manger.)
- Positioning of Links. (Above/Below/Use Global). Displays links above or below the content. (Default is Above—can't not be set in Article Manger.)
- Read more: text. Optional text to display next to the 'Read more...' link. If no text is entered, "Continue Reading" will be displayed.
- Alternative Layout. Use a different layout to override the template. Can't be changed in Article Manager.
Toolbar
At the top left of the Article Editor you will see the following toolbar:
![]()
- Save. Save it, but stay in the same screen. If you have been working on a screen for a long time and don't want to risk losing your work, pressing Save saves your work and lets you continue working. If, for example, you lost your Internet connection, your work will be saved up that point.
- Save & Close. Save and close the current screen. Returns you to the Article Manager.
- Save as Copy. Saves your changes to a copy of the current article. Does not affect the current article. This toolbar icon is not shown if you are creating a new menu item.
- Versions. Opens the Article Version History window to show prior versions of this item. This allows you to view older versions of this item and, if desired, restore from an older version. See Version History below for more information.
- Cancel/Close. Closes the current screen and returns to the previous screen without saving any modifications you have made.
- Help. (located in upper right corner) Opens the Joomla Help Screen.
Version Control
The website keeps the last 10 versions of your article (whenever you do a 'save'.) The Version button will be displayed if there is more than one version of your article. When you click on it the Version button, the Item Version History window opens.
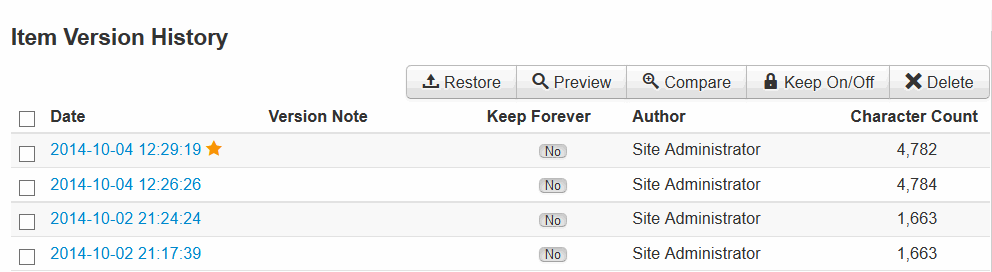
The window has the following options:
- Restore - loads the selected version into the edit window (where it can be saved as the current version.)
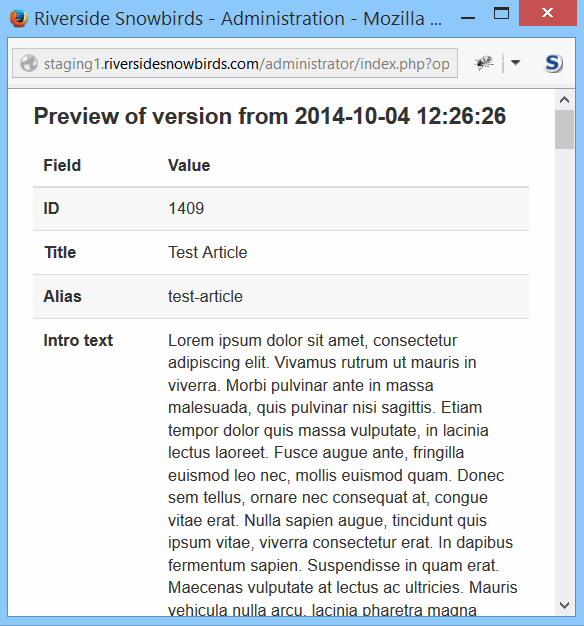
- Preview - shows a preview of the selected version.
- Compare - compares two selected versions.
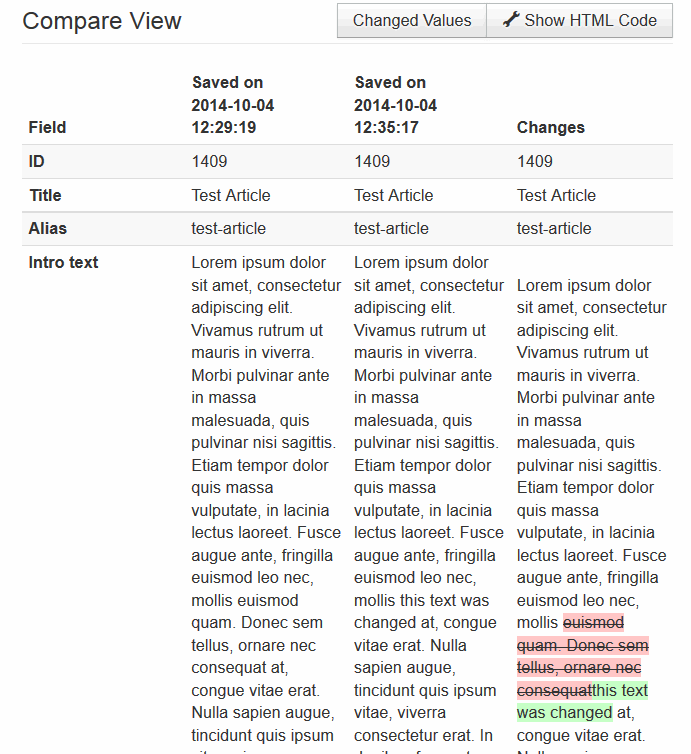
The text of each version is displayed along with with a copy that marks the deleted and inserted text (red = deleted, green = inserted.).
Any changed options are also compared.
- Keep On/Off - toggles keep forever On or Off.
- Delete - Permanently deleted selected versions.
Column Layout
The number of articles that appear in a single column and the number of articles that appear in two (or more) columns can be changed from the default in the Menu Manager. If you do not have access to the Menu Manager, contact a System Administrator to have the defaults changed.